The latest Edge series of Garmin bike computers provides several new "Mountain Bike Specific" metrics when recording your ride. One of the more interesting metrics is the jump detection feature. In our initial tests on the Edge 830 we found that little bumps, wheelies, and hopping up curbs would count as a jump. But if you just ignore those little bumps, and concentrate on the bigger air, the jump metrics (speed, distance, and hang-time) are pretty accurate. We found the data to be good enough to compare jump numbers and provide measurable performance improvements. To provide this data to users, the Trailforks team has added jump metrics with a little bit of historical data to user ridelogs.
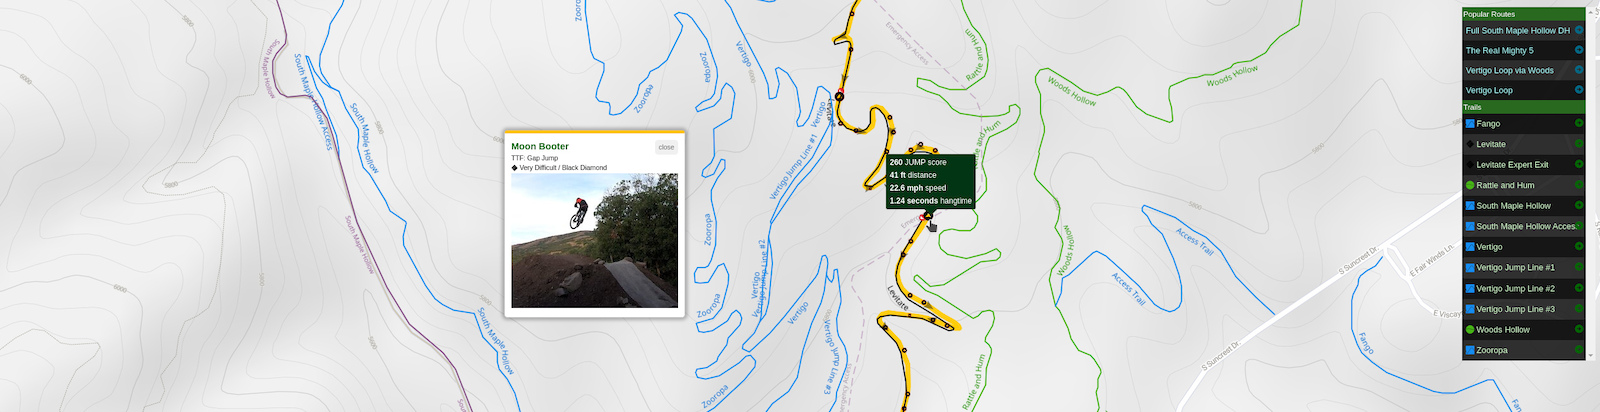
Now when you record your ride with a jump detection capable Garmin Edge Computer and have a connected account, your ridelog will display all the jumps on the map. The "Jump" icon will be bigger if the jump score is higher, so you can quickly find the big jumps you're interested in.
SETUP REQUIREMENTS
This feature currently only works with Garmin Edge units that support the Mountain Bike Metrics:
• Edge 130 Plus
• Edge 530
• Edge 830
• Edge 1030 Plus
This feature currently only works with Garmin Edge units that support the Mountain Bike Metrics:
• Edge 130 Plus
• Edge 530
• Edge 830
• Edge 1030 Plus
Note: In order for Trailforks to process the Garmin data, you must connect Trailforks to your Garmin Connect account. This can be done in the Trailforks User Profile “Settings” under “Connections”.
Note: Existing connections between apps will continue to work if you enable this. So if your Strava account is already connected to your Garmin or your Trailforks account, everything will keep working.
Note: Existing connections between apps will continue to work if you enable this. So if your Strava account is already connected to your Garmin or your Trailforks account, everything will keep working.
Jump Stats
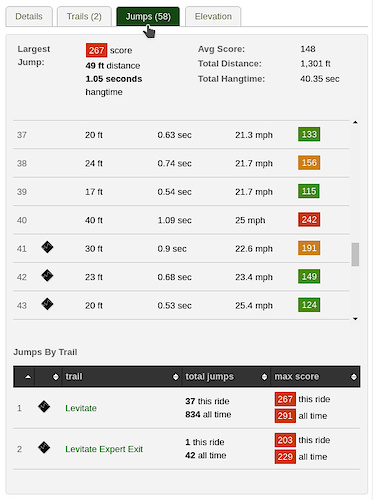
On the ridelog view page, there is a new set of tabs to the right to provide different data metrics about your ride. The new "Jump" tab will indicate all sorts of data about your jump session. The header will display the key metrics like your biggest jump, along with jump metric totals. Below the header are 2 tables that break out your complete jump list and your biggest jumps on each of the trails that were detected. The biggest jump for each trail is shown next to your all-time best for that same trail.
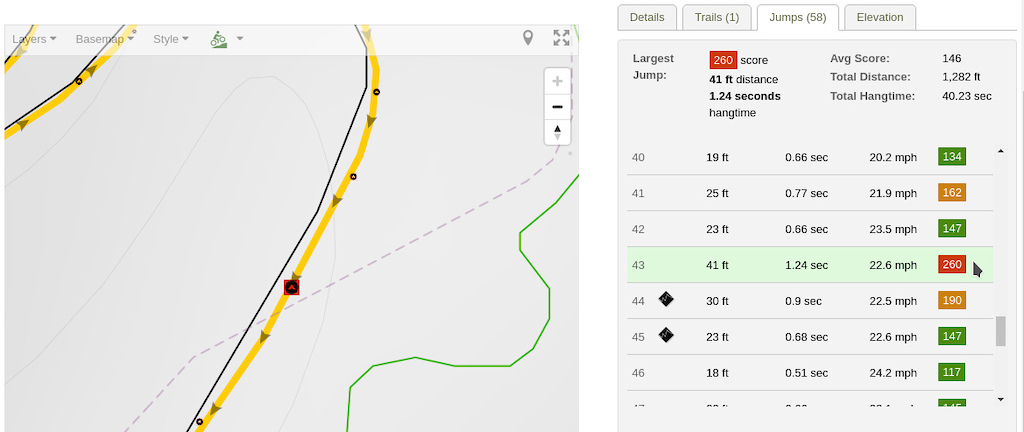
To quickly zoom into any specific jump, just click the colored rectangle that lists your jump score and the map will pan to the location on the map. The map will display jumps in a bigger icon if the jump is bigger, but this also provides a quick way to scroll through all your jumps and quickly locate them on the map.
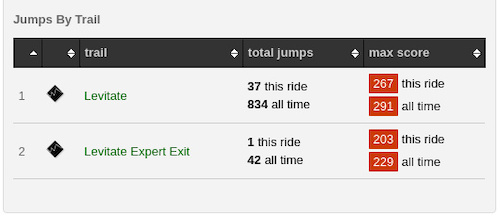
Jumps by Trail
The Jump Tab also provides more jump statistics below the main jump list in a table labelled Jumps by Trail. This table lists all the trails that we detected on the ride, and lists your jump totals for this ride, and a cumulative total from ridelog history. In addition to jump totals, you can compare your highest jump score to your personal best.
Click the trail name to see how you stack up against other riders.
Click the trail name to see how you stack up against other riders.
You can also see jump stats for any trail you may be interested in, but have not yet ridden. Any trail detail page that has at least one ride with jump statistics recorded, will have a Jumps tab listed under the drop-down tab More. This will bring you to a Jump Data page that will display basic jump stats, biggest jumps scores and your personal jump scores.
As an example, I just got done riding Levitate, and I want to see what the jump stats are on the Tsunami Trail at Deer Valley. I search for Tsunami, select it, and the Jumps tab from the More dropdown
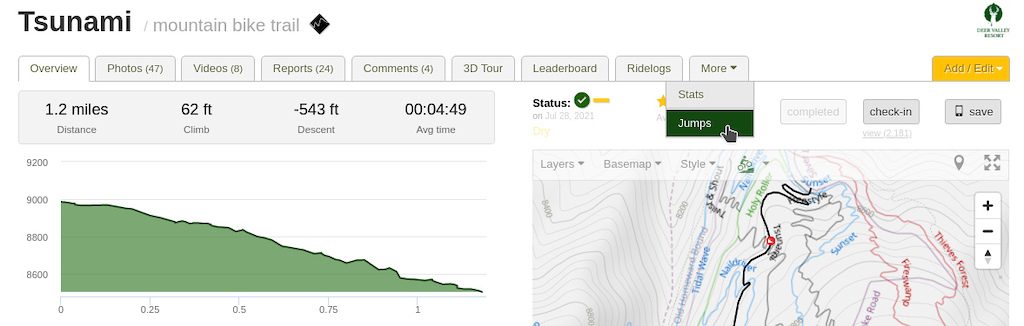
The Jump Data page will display general stats about the trail, the Biggest Jumpers, and your own personal stats. The jump metrics from the Garmin devices provide speed, distance and hangtime. These 3 values are combined to provide a single jump score.

Since this is a new feature, we are excited to see more riders record rides and show us the limits. The score color ranges may need to be adjusted, and we will continually tune this feature with more stats.
Get Started
To start tracking jumps, you must connect your Trailforks Account to your Garmin Connect Account. Click on the provided link below and follow the instructions: Connect your Garmin
As you fill out the Garmin Connection form, you will notice that you have the option to Sync to Strava. By checking this box Trailforks will send all the Garmin data to Strava immediately after the ride. This is a good way to go if you only record rides with the Trailforks App and/or a Garmin devices. If your Garmin Connect account is already configured to send your ride data directly to Strava, do not enable Sync to Strava, or you may see ride data duplicated in Strava.
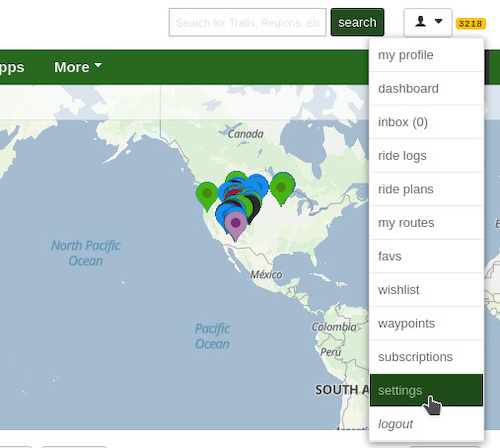
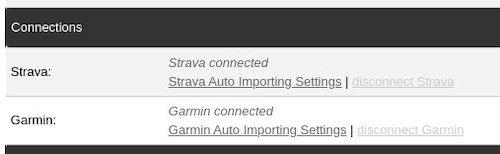
Once you have followed all the steps to connect your Garmin Account, you can verify the connection by going to your User Settings shown in the image to the right. Your user settings page allows you to setup your account preferences.
Once you have successfully connected your account, the connection status will be displayed under the sub-heading Connections and will show "Garmin Connected". If your account does not show "Garmin Connected", click on the Garmin Auto Import Settings link to back to the connection setup page.
Once you have successfully connected your account, the connection status will be displayed under the sub-heading Connections and will show "Garmin Connected". If your account does not show "Garmin Connected", click on the Garmin Auto Import Settings link to back to the connection setup page.